Good news for all of you who have never been too keen on the whole nail art craze: as of late, minimalist nail designs have been popping up everywhere. As Fashionista.com so perfectly put it, “nail art isn’t dead,” it’s just taking a back-to-basics approach. Everything from half moon designs to innovative french tips had a major resurging at the Fall 2014 shows; if that’s not a sign, then I don’t know what is!
Inspired in part by this minimalist manicure spotted at Tibi’s Spring 2014 show, I created a mani that’s a tad bolder, yet maintains the same simple aesthetic. A few strokes of polish and voila – a dynamic design that will shake up your regular #manimonday routine.
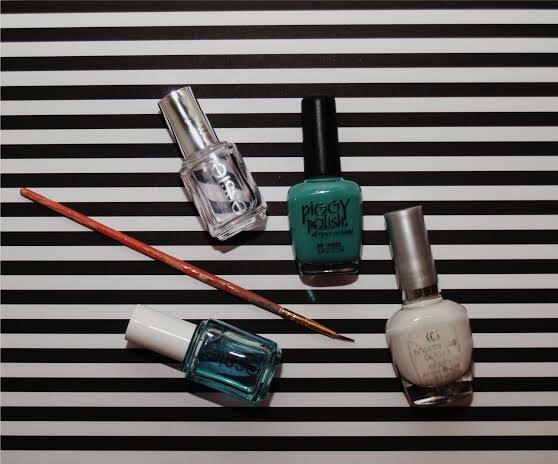
What you’ll need:
- Base coat and fast-drying top coat
- 2 nail lacquers of your choosing (I used my beloved Piggy Polish in “Embrace Adventure” and Cover Girl’s “White Night”)
- Paint brush with small bristles
- Tape
How-to:
1. First, prepare nails by applying a base coat. I swear by Essie’s “all in one base.”
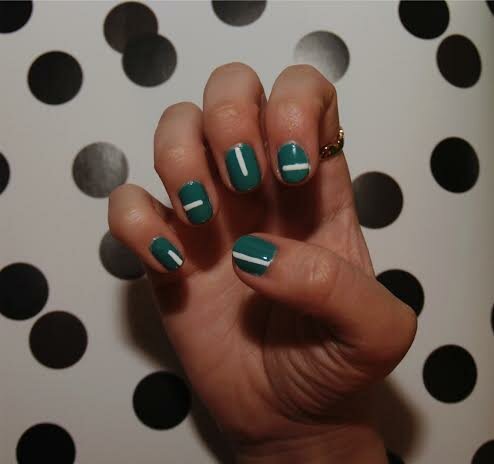
2. Select a color for the backdrop of your nail. Apply two coats and allow for drying time. If you’re like me and are prone to slip-ups, I recommend using a fast-drying top coat such as Essie’s “good to go” – this way, your nails will be dried almost instantly!
3. Next, pick a contrasting color for the horizontal and vertical lines that you plan on painting. Here, you have plenty of freedom in terms of where you want to place your lines as well as the line thickness. In order to achieve as precise a line as possible, I recommend using a piece of tape as a guide. (I learned this the hard way — it quickly became apparent to me that freehanding the lines wasn’t the best idea!) Simply stick the tape to indicate where your line will appear and, with a steady hand, use your paintbrush to apply a stroke along the edge of the tape. Do so for each of your five nails. Let dry.
4. Finish off with a top coat, which will mask any slight imperfections that may appear in your lines.
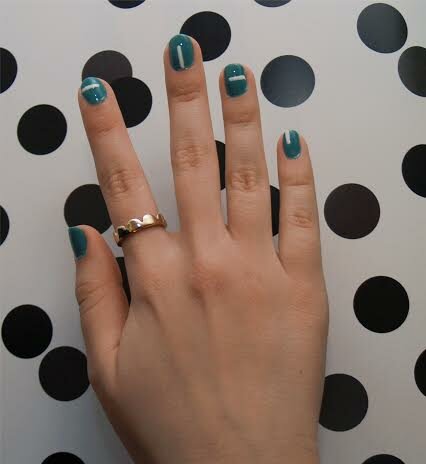
The great thing with this manicure is that you can customize it according to your preferences. Thick or thin lines, vertical or horizontal – it’s completely up to you. The same holds true for the color; a nice neutral base color paired with skinny black lines would be equally chic!
By